Viser innlegg med etiketten 30 days of tutorials. Vis alle innlegg

11/30/2011

Tutorial 30 - a really quick dress

I did start my angel - I promise, I just didn't get it finished....
Instead I made a really quick dress for one of my girls, since they're already asleep you'll have to see pictures with her wearing it tomorrow.

I've had this knit fabric laying in my stash for a little while - I've so wanted to make something out of it and I have been picturing the dress I'm showing you guys today - and then I'll see tomorrow if it really worked!

On a totally side note - our 6 month old cat died today, so my daughter didn't fall asleep until 10 pm - I bet she'll be tired in the morning...
so I id torture her anyway.... better pictures tomorrow
 This is The Dress with an Attitude - my girls are getting bigger, and I think it's so much fun to sometimes dress them in something that has something to say!
 Lay the fabric folded - if you girl isn't older than 7 - the sleeves will be long enough like this.
Put a shirt over the fabric, with the sleeves straight out to the sides. Cut around the shirt, make the under-the-arms rounded. Make the dress longer than what you want the end result to be.
 Make sure the dress matches on both sides.
 Sew the top of the sleeves on both sides of the neckline - right sides towards right side.
If you need to make the neckline bigger, you cut down the front of the dress.
Tuck in the neckline and sew around it.
Sew from underneath the sleeve and all the way to the bottom of the dress.
I left the ends of my sleeves and the bottom of my dress with raw edges - it's that attitude...
 Get two pieces of elastic, start underneath the arm, pull as your sewing down to the waist on both sides.
The dress with the attitude...

so so tired...

her idea!
 My daughter can't sleep- at 10:45 pm, she just tried it on - can't torture her with pictures at this hour, but yes, she's got ATTITUDE!

I guess this was my last tutorial - at least of the 30 tutorials of November!
I hope you've enjoyed the ride, tomorrow I'm starting advent season - and I promise this won't be the last tutorial I do.

11/29/2011

Tutorial 29 - knitted blanket

I almost didn't make it today... I've had my Bible Study group at my house today - I love those evenings, it's so nice being able to talk about what matters most with someone that feels the same way. Today I want to show you how to make a kitted blanket.


The pattern is very simple

Use two types of yarn, one mohair and one wool
BIG sized needle
I don't really know how many stitches I've got - but make it as wide as you please.
then the pattern goes like this:
4 rows of straight knit
1 row of: two together, one loop over, two together, one loop over all the way
4 rows of straight knit
1 row of: two together, one loop over, two together, one loop over all the way
continue until desired length

Well, last tutorial tomorrow - i'm really hoping I'll have an angel ready for you, if not, I'll have to figure out something else.
And I must have at least 30 more tutorials I want to do, so I don't think the tutorials are over yet.

11/28/2011

Tutorial 28 - crochet Christmas chain

wow - I'm so late today, it's almost not the 28th anymore here in Norway - but here it is...


I've got five different colors, 20 chains, and it's for a fellow blogger - I hope she enjoys the colors I chose, I think they look Christmassy.

I used cotton yarn, hook number 3 (European size)
Make a loop, crochet 7 chain stitches
put your hook in the second stitch from the hook, then 5 single crochet back
turn, 2 chain stitches, 5 single crochet - and so on until desired length

It's not hard - but 20 chains take some time!!!

And tomorrow - my second last tutorial before I start with the Advent series!

11/27/2011

Tutorial 27 - angel wings from paper

I really didn't feel like sewing today, besides, it's Sunday and I should be able to do what I want, so there. It's extremely windy here today, and my car broke down yesterday. On top of that I had to be at church - no car... we had to walk. It's not very far, but with all the wind, it's very tiring. It' so windy I didn't dare to get the girls to ride their bikes. I was afraid they would get blown over. On top of all of this (not complaining - we've had a beautiful 1st Sunday of advent) the power went - due to the wind, which meant no sewing machine. 

Because of ALL of this you're getting a paper craft today. The girls were in the bath when I finished it and hung it, when they came into the living room - they both exclaimed: "OH MOMMY!" - I guess they like it!
 It's a very quick project.
 You'll need: cardboard, news paper/old books/music notes, glue/mod podge and rope
 trace your wing on a pattern sheet - or a piece of paper, cut it out
 trace it on some cardboard - both wings
 get the news paper or old books, start to glue pieces in a criss cross pattern. I decided to use the colored side of the card board, an old ice cream box - the if someone looks at the back, it's just brown - or you can glue both sides.
 put glue on top of everything as well - let it dry
 tie the rope around the middle a few times, then put some rope around the rope in the wings and hang up.
We decided smaller versions of these would make perfect gift tags!
And tomorrow you'll get a.... I don't know yet - a good thing I only have three more to go - and don't get me wrong, I LOOOOVE this month of tutorials

11/26/2011

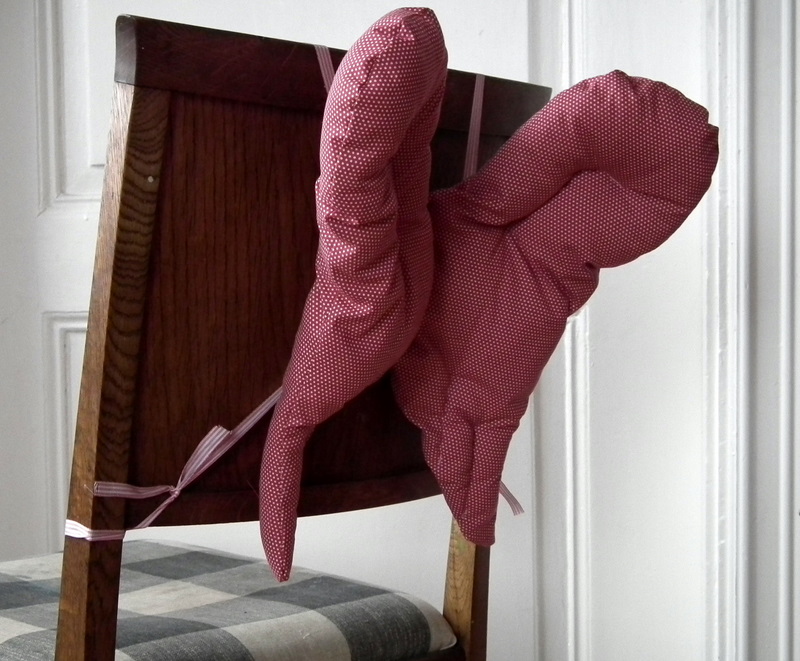
Tutorial 26 - angel wings for the chair

I had something else planned for today, but sitting here by the computer, I suddenly remembered an idea that passed through my head a few days ago, and I had to try. And I think it worked!

 Decorating the Christmas table with angel wings on the chairs! - And wouldn't this just be perfect as seating cards at a girl's birthday? I know I want to do this for my girls 7th party - with names on for each girl! Perfect
 Because they also fit so very well on the back.
 You need:
paper for drawing your pattern
fabric
ribbon
stuffing

1: draw your pattern - one of the wings
 place the pattern on a folded fabric - cut two
 2: sew on four pieces of ribbon - I use long ones on top and short ones on the bottom - on the second one I'll try to reverse this
 3: put the pieces together - right side towards right - tuck in the ribbon, sew all the way around, leaving a hole for turning and stuffing.
 4: Stuff however thick you want it, top stitch the hole
 5: add some texture by top stitching a pattern on the wings
 I'm really happy with this- I am making one for every chair around my dinner table - and adding the names of my girls and my nieces for the Christmas dinner!
One happy angel gt her wings - happy weekend!

11/25/2011

tutorial 15 - advent calendar

tutorial 25!!!! I can't believe I've gotten this far. I'm having so much fun. Being really, really tired today, though, I didn't quite finish todays post, I dare you to figure out what's not finished...

I've told you before how I want my girls to learn how Christmas is not just about them receiving many gifts. We're doing an activity calendar - where we both focus on spending fun time together as a family and care about other people.

Then Kirstin from KoJo Designs had THIS post over at I am Mommy. Hear me Roar - and I was smitten - I looooove the idea. But Christmas traditions are different in Norway than in the US - we celebrate the 24th, we put up the tree the 23rd, so this idea didn't really work for me. Then it just HIT me - why not incorporate Kirstin's Idea with mine?

Here is my girls' advent calendar:
 Instead of just making notes about our activity that day, I sewed up a square with the numbers on one side and a pocket to hold the note on the other side. On the pocket I wrote the names of Jesus on -that way we can have a nice talk about Jesus being the reason for the season every day!
 I cut out 24 pieces of one fabric and 24 pieces of the other - 4x3 inch - wrote the numbers with a fabric pen - I was in a rush, it would have been nice to hand stitch all the numbers and all the names, maybe next year...

 I wrote with capital letters so that they can read them more easily - and in Norwegian. Kirstin's original post has a link to all the names.
 Cut out 24 pockets - a little smaller than the main piece - I cut the main pieces with my cutting board, but the pockets with zig zag scissors. Sew the pocket on.
 Put the two pieces together - leave a piece of string on top, and sew around all four sides.
 Cut around the sides with the zig zg scissors - the fabric won't fray.
 Put them up on your calendar, and turn one at a time.
 Let's picture it's the 4th - the pocket holds the note about the activity, we're going to talk about Jesus being the bread of life - and in a basket on the floor underneath everything we're going to use for the activity that day will be. Figured it's important to be ready for the activity, it's more likely it'll get done that way.

I'm so thankful I read Kirstin's post - this is exactly what I wanted for advent for my girls!
Visit thecsiproject.com