Viser innlegg med etiketten tutorial. Vis alle innlegg

11/07/2012

Shirt and skirt tutorials

So, here are the tutorials i promised you, both for the shirt first and the part of the skirt.


Materials needed:
1 yard knit fabric
lace
ric rac or ribbon

Cut out a pattern from an old shirt or desired pattern.
Front piece, back piece and two sleeves.
Sew the shoulder seams of the front and back together, right sides together.
Sew the sleeve to the bodice.

Sew the sleeve and down the bodice part in one seam. Repeat on other side.
Cut one long piece, about 2 inch wide on the diagonal. Fold over, wrong sides together. Attach to the neck line.
Cut the lace a little wider than the bodice and your desired length.

Ruffle the lace to fit the bodice.
Pin it to the bodice, top stitch around. Make as many layers as you please.
Sew a ribbon or a ric rac to the bottom hem.

Skirt:
Materials:
1/2 yrd cotton
Lace
binding
2 buttons
zipper
elastic
Sew a basic skirt with a waistband. I made mine a little wide and a little roomy around the waist.

Cut the lace the desired width - make it a little ruffly, sew binding across the top.
Fasten two buttons, one on each side.
Measure where you want your button holes. Sew them.
Now you can fasten the lace apron and remove it - two skirts in one!
In the back - fasten a zipper - I wanted a visible one.

Because I had some elastic that was black and a little pretty, I decided to sew it on the outside for decorations - pull the elastic as you sew.

Now your child can wear her new skirt!

12/01/2011

1

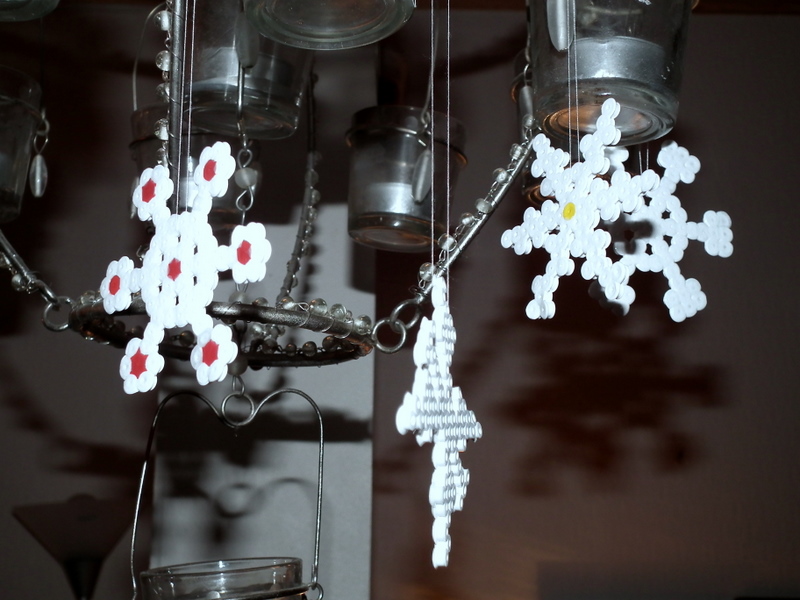
Finally December 1st! The girls were so excited this morning opening their advent calendars - yes, plural. Today in our home made calendar they found out we were making snow flakes from perlers. We ended up doing them kind of late, and Angel almost threw a fit! But everything turned out so nice - and the once the girls made are so beautiful.
 Our snow flakes are going up on the tree when we get the tree - December 23td.

 All white perlers.
 This was the easiest shape to make the nice snow flakes - easy to make something in the middle and then go out to each corner.

 My non-conformist had to have some red in there.
The name for Jesus today was: The Word - we had a nice talk about how everything He says becomes. How in John it says: In the beginning was the Word, and the Word was with God.

I'm going to like this years advent - family time and family sharing - with the right focus.

I'll share my schedule with you again - I might change things up a bit, my car broke down and is now being taken to the chop chop - some of the things on the list requires a car....


1. make perler snow crystals2. bake ginger bread people3 paint t-shirts as gifts4 Visit old lonely aunt
5 look for old toys to send to poor kids6 sew hearts7 write Christmas cards8 invite someone for a visit9 make napkin rings with pearls10 bake Christmas cookies11 ring on someones doorbell, leave candy and run away
12 Send presents to grandma and Philippines13. sing Lucia songs for neighbor14 make Christmas candy15 make candles16 watch a movie with mommy and eat ice cream17 make erasers18 bake
19 wrap presents and hand out to their friends20 bake21. go Christmas shopping for your sister22 Go to play land23 decorate for Christmas24 Candy

Visit thecsiproject.com

11/12/2011

SDS 12 - baby mobile

Today I have a very quick project for you guys that came out of annoyance joy of everything my girls make... They love to make EVERY shape under the sun of the Perler Beads - and then iron the shape so we can keep it forever. And we have these shapes everywhere in the house. And beause they also make them other places, when I pull out a different handbag - I'll find some in there as well. Anyone else not always cleaning ut your handbag before you put it away? No? - Guess it's just me then...

 I had these - and this is not even all of them....
 and I NEEDED to find some way I could make some use of them. I came up with a mobile. Because we don't have a baby in the house, we placed it in front of the bathroom window.
Find a branch you want to use. Take some of your shapes... pull a needle with some thread through the top middle bead. And hang them up on your branch.
I know there are a lot of people that make these beads into snowflakes - (just not my girls...) and I think that would look so pretty for Christmas with a branch full of snowflakes...

Come back tomorrow - for a sewing project!

9/30/2011

Ruffled dress tutorial

 Still waiting for the Arielle skirt tutorial? Yeah, I know, I'm bad like that - I don't always deliver like I want to... kids, au pair and life i general get in the way of my plans. But I do have a tutorial for you - my All Ruffly dress. The girls were invited to a birthday party Wednesday, and they were going straight from school, so they "needed" something easy to change into, and not too cold. Princess bought picked out this fabric over a year ago, she loves it. So I kind of decided that it was time to use it. I made the dress in 10-15 minutes inbetween job and the girls' choir practice.
 You need:
a t-shirt
ruffled fabric, length from chest to desired length.

 Cut the t-shirt underneath the sleeves - there has to be something left for seam allowance.
 Put the t-shirt on top of the ruffled fabric, cut a diagonal line from the top of the ruffled fabric out to the edge, on both sides -  the skirt will be a little a-line, but not fully. Sorry, I don't have a picture of this. Sew up the side seams of the skirt - where you cut it. Then attach the skirt to the t-shirt, make a flower of the leftovers from the sides you cut off and voila:
"Are you putting on the internet? Then I have to lift my chin to hide my face a little..."
 The All ruffly dress.

Happy day!

8/05/2011

Jeans skirts - tutorial

This is the tutorial I showed over at Me Sew Ceazy last week. Thi nking I should get it on here as well.

Yesterday was such a crazy day for me... I attended my uncle's funeral, he died last week, only 53 years old, after struggling cancer for the past 7 months. I was very sad, and I think we're still a little shocked he is gone.

Later I got some VERY good news. Since I'm a single parent, and have to juggle a full time job, a house, garden and two little girls just starting school, I am having an au pair - like a live-in nanny. She's from the Philipines and her sister has lived here before. Yesterday I was told she got her VISA - yeah!!!! Nor my girls and my house are taken care of. Gotta love it!!!!.

Now for the jean skirt tutorial:
 I love it when I make something for free! (Well, almost free, I did use some thread)
 I've only used old clothes to make these skirts, old jeans full of holes and other clothes.
 Start out with old clothes, one pair of jeans that still fit your child around the waist, some thread and some bias tape.
Step 1: Cut you scraps into squares, make them differnet lengths, but the same heights (I didn't)
Step 2: The old jeans your child still fits, cut off the legs - like shown below. I chose to cut it below the pockets because I know my girls love pockets.
Front view
Back view
Step 3: Sew your squares into two rows. As you can see in the picture above, I used some squares where I kept the sewn hem, some squares without a hem. I'll show you later what I did with the ones without a hem.
Step 4: Sew the two rows together.
Step 5: Sew the sideseam.
Step 6: Attach the skirt to the cut-off pants. Put the "pants" inside the skirt - right sides together. The skirt is wider than the "pants" - wrinkle the skirt to fit the "pants"
Step 7: Sew some colorfull bias tape to the scuares without a hem.
My girl sporting her skirt.
The blue striped fabric is from a pyjamas, and I used the pocket on one of the squares - which was a hit!!!
One of the old girls' jeans had an embroidered flower.
Mh! Wonder if I can take one more step without getting wet?